I hope all of you in the US had a wonderful (and tasty!) Thanksgiving. We enjoyed a great meal and I had perhaps more than my fair share of pie! I’m thinking about spending the rest of the evening on the couch handsewing the binding on this little quilt I’ve been working on, and I’m sure that I may not be able to resist the urge to check out a few online sales over the weekend.
I checked in with my sponsors to find out about their sales, and I’ve included all the info below for you, in case you should also be unable to resist the sales!
Fat Quarter Shop: 25% off the entire store Friday through Saturday, 11/29. No coupon needed. (And remember, they now offer free shipping on US orders over $80)
Lady Belle Fabric: 1/2 yards starting at just $2.50. Fat quarter bundles are 15% off and jelly rolls are 10% off. Free shipping on orders over $75. Friday through Monday.
Westwood Acres: Shop their biggest sale of the year – lots of great fabrics, thread, and notions in their large sale section.
Fabricworm: 24 hour Black Friday sale, with 30-75% off lots of newly marked down fabrics. Ends Saturday at 8am PST.
Intrepid Thread: Yardage and 1/2 yard bundles at least 30% off, with deeper discounts in the clearance section. Sale starts at midnight Thursday and ends midnight on Friday.
FabricBubb: 10% off orders with discount code TURKEY10. Save 15% on orders of $250 or more with code BIGTURKEY15. Sale runs through Monday.
Canton Village Quilt Works: All Batiks and Kaffe Fassett are marked down by 25%! No code needed! Valid Cyber Monday.
Llama Fabrics: Check out the Black Friday Sale section, which will include many fabric bundles, fabrics, patterns and more! Sale runs from midnight Thursday to midnight Friday ET.
Nido: In store sales Friday-Saturday will include a sale on fabric yardage, with deeper discounts if you purchase multiple yards. Sale fabrics will be $5/yard. 10% off yarn. Cyber Monday sale of 20% off is valid in store and online with discount code HOLIDAY2014.
DuckaDilly: 20% off storewide. Discount may be applied to both regular and sale priced items (excludes gift cards and subscriptions). Use coupon code “BlackFriday2014” during checkout. Valid through Saturday, 11/29.
Jones & Vandermeer: 15% off everything (excludes shipping; please no prior or post adjustments) + free US shipping for orders $60+. Use code “THANKSFILM15” (enter on Step 5 of check-out).
Hawthorne Threads: Many great fabric lines are on sale for $7.50 or $7.99/yard, including a few by Heather Ross and Anna Maria Horner. You’ll also find a sale on select precuts, quilt kits and patterns. Valid through Monday.
Pink Castle Fabrics: 30% off with code BLACKFRIDAY30. (Doesn’t include camp tickets, presales or clubs)
The Quilted Castle: 25% off all regularly priced items with code TURKEY25 (does not apply to discounted items, cannot be combined with other offers. Code must be entered when ordering.) Valid through Monday, 12/1.
Stitched: 20% off one item $100 or more with code BF2014. Valid through Monday, 12/1
Sew Modern: 20% off fabric, including sale items, with code BIGTURKEY. Valid through Monday, 12/1
_ _ _
And wait, there’s more! These aren’t sponsors, just other shops/products I like with sales over the weekend…
Grainline Studio: Give Thanks pattern sale – take 20% off all patterns with code GIVETHANKS. Valid through December 1st.
True Bias: 20% off patterns with code THANKS20. Valid through Monday.
Finch Sewing Studio: In store and online sale – 30% off orders of $15 or more online Friday from 6am-11am with code EARLYFINCH. 15% off orders of $30 or more Friday afternoon through Monday with code FINCHMADEHOLIDAY.
Imagine Gnats: 50% off printed and digital patterns. 30% off chambray and denim fabrics, 20% off everything else. Valid through 12/1.
Patchwork Threads: 20% off all apparel with code THANKS. Valid through 12/1.
Soak: Free shipping with code SOAKWORTHY
Alison Glass Design: Save 20% storewide with code FRIDAY. Valid until 5pm on Friday.
_ _ _
Slightly off topic, though not… do you use Ebates? My sister turned me on to it about a year ago. They provide cash back for purchases you make at larger online shops (think Gap, Old Navy, Macy’s, Sephora etc… Fabric.com is even on there, so not so off topic after all!). Once you set up an account, you just click through to your desired online store from Ebates and it shows you the % cash back that particular store offers. Then you just shop as usual. Periodically they send out checks, which I find to be a nice little reward for shopping! (We’re not talking huge amounts here, but when I can remember to click through from them, I’m rewarded by a fun $10-$15 check every once in a while!)
*link above is a referral link, though I’d recommend the site regardless! Feel free to just type in ebates.com in your browser if you don’t want to use the referral link.


 Greater than/less than
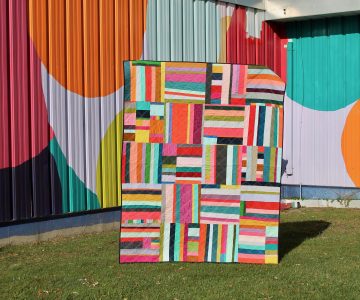 scrappy solids