
I tend to buy fabrics with smaller prints for use in quilts, yet I’m often still drawn to busier prints, or those with larger designs. Then I buy them and they sit in my stash because I can’t seem to work them into a quilt top. I decided to come up with a quilt design which would allow me to use one of those great fabrics as the backing along with coordinating prints for the quilt top. The measurements are such so that you can use a single piece of regular width fabric for the backing.

If you want to make a similar quilt, here are the measurements and other info –
___
Materials required for a baby quilt, which measures about 38″ x 41″ (after washing):
1.5 yards backing fabric (you’ll need your backing to be about 48″ by the width of fabric, so there will be a bit left over if you buy 1.5 yards)
20 corresponding 8.5″ squares of printed fabrics (a layer cake would work really well here, or 1/4 yard cuts or fat quarters). You’ll need 20 different fabrics if you want each to be unique. Or you can duplicate some of the prints, as I did in this quilt, to reduce the number of printed fabrics you need.
A selection of solid fabrics, totaling just under 1/2 yard. See *notes below for possible variations for the solid sections.
Batting – a piece measuring approximately 44″ x 48″
1/2 yard fabric for binding
Note: 1/4 seam allowances used
___
First you’ll need to pick a backing fabric. For this one, I used a piece of Alexander Henry My Secret Garden that I had in my stash for a long time. I really love it in its entirety, so I thought it would be perfect to use as a backing. From there I pulled out smaller prints in corresponding colors. I used a total of 17 prints, and used three of them twice.
Cut a total of 20 8.5″ squares from these printed fabrics.

You’ll make 4 rows of 5 blocks. I arranged mine on the floor, changing them around until I found a layout I liked.

Sew the 5 blocks together for each row and iron all seams. Each row should measure 8.5″ x 40.5″.
Now that all the blocks are done, you’ll work on the stripes. Each striped section is 4.5″ x 40.5″. For my quilt, I decided to use up some of my solid scraps, so I selected several which coordinated with the printed fabrics. I went for a scrappy, patchwork look, as you can see in the photo below –

For the first and third striped sections, you’ll need a selection of scraps that are 2″ by a variety of widths, and a selection that are 3″ by a variety of widths. The middle striped section is made up of two stripes of 2.5″ wide fabrics by a variety of widths. (You can change this up however you’d like – just make sure your finished width for each striped section equals 4.5″.)
For the first striped section, sew together the 2″ wide pieces, until you have a strip that’s at least 40.5″ long. Repeat with the 3″ wide pieces, again sewing them together until it measures at least 40.5″ long. (I staggered my pieces so that the seams in each strip would be offset from the seams in the second strip). Iron all seams, then sew the strips together, sewing along the long side. The 2″ section is on top. Iron that seam.
Repeat this process for each striped section. Each section should now measure 4.5″ x 40.5″.
(The second striped section is made up of 2 strips of 2.5″ wide fabrics sewn together, and the last section is a 3″ wide strip and a 2″ wide strip sewn together, with the 3″ wide strip at the top.)
*Notes: There are a variety of options for the solid striped sections. If you don’t like the scrappy look, you could opt to use one solid color for each striped section. Or it might be nice to use a few different shades of one color, etc…
Trim each strip to 40.5″ long. Now you’ll sew the first row of blocks to the first striped section. Continue sewing the blocks to the stripes until you have a completed quilt top measuring about 40.5″ x 44.5″. Finish the quilt by sandwiching, quilting and binding using your favorite methods.

I quilted this one with a grid pattern, varying the distance between the quilting lines. I was going for a bit of a ‘not so perfectly straight’ look, so I didn’t mark out any of the lines ahead of time. Inspiration for this quilt came from one of the first quilts I made, the original Blocks and Stripes quilt.
Also, I’d love to see it if you make a quilt from this tutorial! Please be sure to add photos to the Filminthefridge Quilts! Flickr group.


 Greater than/less than
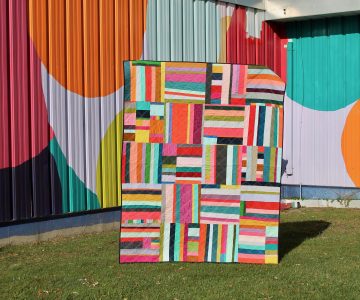 scrappy solids