You asked for it!
[And now for a word of warning – this tutorial is more about the process I used when putting together these blocks. It may not be the best way to do it, and you might find something that works better for you, but these are the steps I took. Also, please note ahead of time that this particular method does create some waste, so keep that in mind if you plan on making these blocks with your favorite fabrics!
Oh, and one last thing, I’m sure some of this might be unclear, mainly since I wrote it in a hurry before work this morning — feel free to ask questions!]
Let’s get started! You’ll need a variety of scraps – for 10″ blocks, you’ll need scraps that are at least 6″ in length and a variety of widths. To start, I pull out about 5 or 6 scraps which would make up half the square and I lay them out and kind of visualize the rectangular shape I’ll be making. I’ve been making 10″ blocks, so each trimmed half square block will measure 5.25″ x 10″.

I start from the left side and grab a piece that’s about 6″ long (since the points line up in the center, you’ll need pieces that extend at least 5.5 – 6″ from where the center point will be.The next piece will need to be slightly longer, since it’s on a diagonal – about 7″ or so, and so on. I lay mine out on my cutting mat so I can check to make sure that the pieces will cover the area I need for the rectangle. When you’re starting out, it might help to cut a piece of paper to the 5.25″ x 10″ size and lay your pieces over the paper so you can be sure they’re large enough to cover that area, keeping your seam allowances in mind (I find that bigger is always better, since you can just trim it down to size later!)

Start with the two pieces on the left, and with right sides together, angle the second piece on top of the first and sew, going from the longest part of the first piece and angling down so you have a wedge shape. I recommend that you sew an angle that doesn’t go directly to the point of the first piece of fabric. You’ll want your points to match up about 1/4″ – 1/2″ or so away from the edge of the fabric so that you’ll be able to trim it to the correct size later. (it may help to read through the rest of the tutorial first so you can see what I mean).

Trim the excess fabric and iron seams open.

Add the next piece of fabric. With right sides together, make sure that this next piece of fabric is about 1/4″ away from the point where the fabrics are coming together. This will ensure that your points meet when you add this next strip, sewing with a 1/4″ seam allowance. Trim excess fabric and press.

As you sew the pieces together, you can check to make sure that your sizes are correct. As you can see in the photo above, you should have about 6″ in length from where the fabrics meet at the point, and you should have about the same distance in height.
Keep in mind that you’ll want to make sure that the point where your fabrics meet isn’t on the very edge of the fabric, but rather about a 1/4″ in from the edge, as you can see above. When you trim it down to size, you’ll need this extra 1/4″ for the seam allowance so you can sew the two halves together. (this might not make sense right now, but it will later when you go to trim it).

Continue sewing the pieces until you’ve pieced enough fabric to cover the necessary area.

Trim the block to size. As you can see from the photo, you’ll position the point in the middle and then will trim 5″ away from the point on each edge. Trim the bottom edge 1/4″ below the point (I position the point where the fabrics meet on an intersecting line on my cutting mat and then using a clear ruler you can easily make sure that you’re trimming 1/4″ below that point). Trim the top edge 5 1/4″ from the bottom edge.

And here you can see two finished blocks – you can see that they’re both trimmed to 5.25″ x 10″, leaving 1/4″ below the point where the fabrics meet at the center).

Sew them together, matching the center points and iron the seam open. Since there’s so much fabric meeting right at the middle, it will be hard to iron and there will be a slight bump right there in the center. I used extra steam and pressed quite hard to make it as flat as possible. Your resulting block will be 10″ square.
Stand back and admire your crazy new starburst block! (and then go make a bunch more for an entire crazy starburst quilt!)


 Greater than/less than
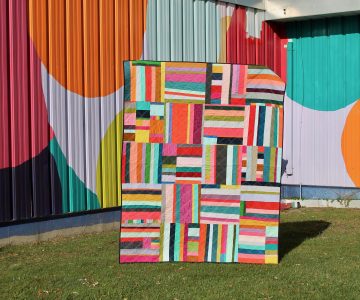 scrappy solids