I have a dilemma, or actually two…
I showed you the start of this quilt before Christmas. It’s made up entirely of Etsuko Furuya fabrics from many different lines, including the newest – I just love those pigs!

The idea for this quilt started when I made up a few little log cabin blocks out of these fabrics. I ultimately decided to use the little blocks for the back, so I came up with a larger, modified log cabin-ish look for the front. I started from the center and worked my way out, starting with a piece of the bird on a ball print in ivory. (This is the only piece I had, and explains why the bird’s head is cut off on the top of that piece of fabric – if I had had more fabric, I certainly would have cut differently!)
I really like these bright prints, and the way they work together. And while I love the way some of these prints come already mixed with a variety of patterns (like the scooter print, with its stripes and polka dots), I also like cutting them apart and recombining them. In creating strips for this quilt, I randomly inserted a variety of other prints, and I think it adds a lot of visual interest.

This quilt was fun to work on, as I had no particular idea in mind when I started. I just put the stack of fabrics on the couch and tried to randomly select them as I went along, without thinking too much about particular placements (easier said than done!).
These are a couple of my favorite sections


I love the color combo in the first (and the pig, of course!) and the scooter inserted into the line of cars in the second.
And now, the dilemma(s) –
This quilt top now measures 52″ x 66″ and at this point I consider it finished. However, it’s been mentioned that since I’ve already done this much work, perhaps I should get a few more prints and continue to make it more of a bed-sized quilt. Of course, at this size, it’s getting harder to work with, so perhaps part of my hesitation is just laziness. In addition, I don’t know how much shrinkage to expect. Does anyone know?
Secondly, I’m at a loss on how it should be quilted… meandering, stitch in the ditch, a variety of designs? It’s been living on our guest bed and I go in and stare at it and I haven’t been able to come up with anything. I’d certainly appreciate any suggestions!

Edit: Thank you so much for all the helpful suggestions! You’ve given me so much to think about. I am glad that most people think a lap sized quilt is best – that’s what I was leaning towards as well!


 Greater than/less than
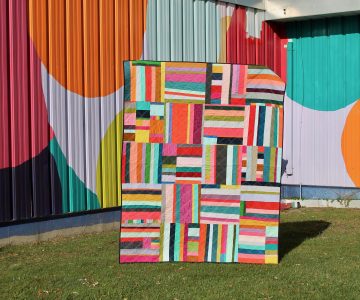 scrappy solids