
Well, no baby news yet, but I do have a quilt to show you — it’s always a great feeling to finish a quilt! No matter how many I make, I always look forward to pulling a new one from the dryer.
I put off quilting this one for a while since it’s on the larger size (and I was feeling too large to attempt it!). But I finally decided to go for it, and I’m so glad I did – it’s fun to have this one finished!

It’s made up of Denyse Schmidt Greenfield Hill fabrics in the Dogwood palette, along with some Japanese polka dots, some Erin Michael Lush, a bit of Cake Rock Beach and a couple Essex solids.
I made up a bunch of these blocks (which you can see here and here) and then decided to play a bit with the layout, setting the blocks on point and scattering them through the center of this quilt, amidst a sea of Kona Snow.

On the back, I used up most of the leftover printed fabrics to create this stacked strip, bordered on either side with more Kona Snow.

I’ve always loved the look of stacked and staggered blocks, and it’s always been on my list to make a quilt top in this manner. Perhaps looking at this backing will motivate me to finally do that!

(love that random triangle!)
I quilted this one with straight lines, echoing the square blocks – quilting on either side of the narrow sashing. I was hoping to leave it like that, but there was too much space between the quilting lines so I filled in with some additional straight lines through each block. And actually, I like it better like this, so I’m glad it turned out that way.

I made up a scrappy binding using the remaining fabrics, and I love how it looks. Typically I’m more of a solid binding kind of girl, but since there was so much white space around the edges of this quilt, I thought scrappy and printed might work well and I’m pretty pleased with the look!

Definitely looking forward to spending some time on the couch with this one!


 Greater than/less than
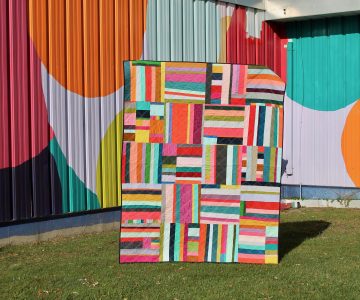 scrappy solids